Create virtual machine from template HTML5: Skirtumas tarp puslapio versijų
| (nerodoma viena tarpinė versija, sukurta to paties naudotojo) | |||
| 1 eilutė: | 1 eilutė: | ||
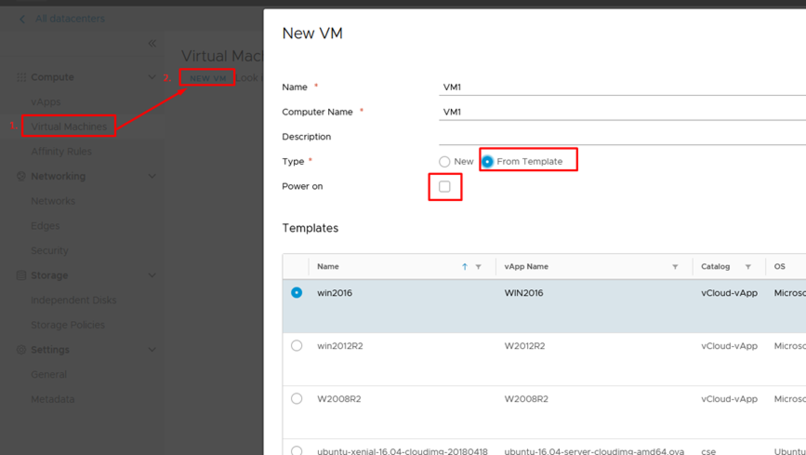
| + | 1. If you want to deploy a new virtual machine by using a pre-installed template, click on the '''New VM''' button. Enter a name and hostname for the virtual machine, '''uncheck''' the box Power on. Select the template you want to use for this deployment and click '''OK''' to continue. |
||
| − | Norėdami sukurti virtualią mašiną, prisijunkite prie organizacijos. |
||
| + | [[Vaizdas:Createvm1.png|806x806px]] |
||
| − | 1. Spauskite Virtual Machines > NEW VM |
||
| + | |||
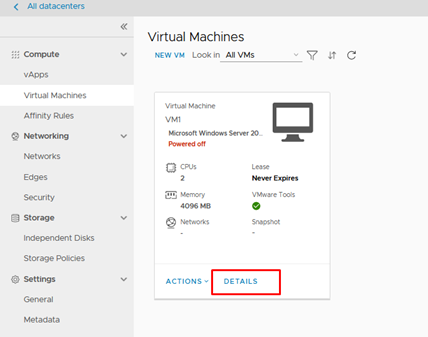
| + | 2. Once the VM's have been deployed, you want to review the virtual machine configuration. Do this by selecting the Virtual Machines section and click on the Details button of the newly created VM. |
||
| + | [[Vaizdas:Createvm2.png|none|miniatiūra|428x428px]] |
||
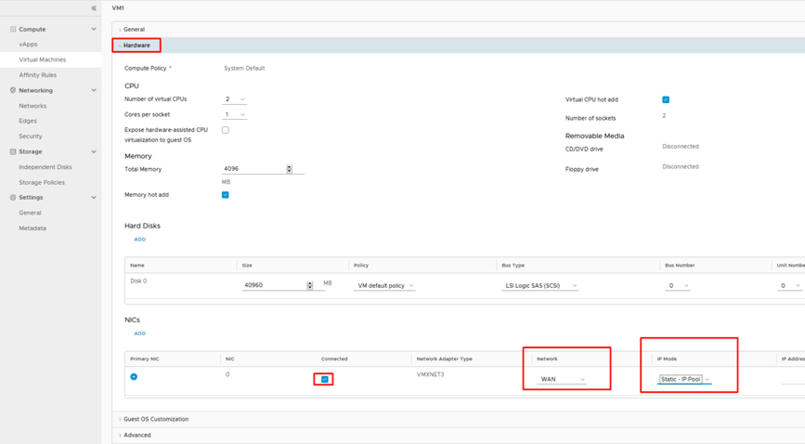
| + | 3. On the Details page, navigate to the '''Hardware''' section. Adjust the amount of resources assigned to the virtual machine according to your needs, and ensure that a network and IP mode are selected and the NIC is connected. Then click Save to continue. |
||
| − | [[Vaizdas:Cloud70.png|602x602px]] |
||
| + | [[Vaizdas:Createvm3.png|none|miniatiūra|805x805px]] |
||
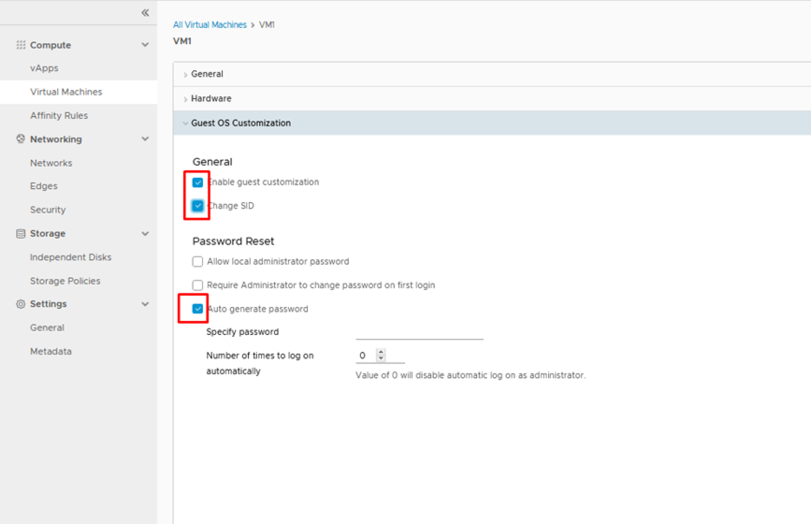
| + | 4. On the Details page, navigate to the '''Guest OS Customization''' section. Enable guest customization, change SID and Auto generate password. Then click Save to continue. |
||
| − | 2. Atsidariusiame lange įveskite virtualios mašinos vardą, serverio pavadinimą. Pasirinkite „Type“ - „From Template“ (kuriama nauja virtuali mašina iš paruošto Template). Pasirinkite operacinę sistemą. |
||
| + | [[Vaizdas:Createvm4.png|none|miniatiūra|811x811px]] |
||
| − | |||
| − | [[Vaizdas:Cloud71.png|602x602px]] |
||
| − | |||
| − | 3. Jeigu organizacijoje turite išskirtą SSD ir HDD ir norite pasikeisti disko tipą, lango apačioje galima pasirinkti „Use custom storage policy“: |
||
| − | |||
| − | [[Vaizdas:Cloud73.png|602x602px]] |
||
| − | |||
| − | 4. Spaudžiame OK. |
||
| − | |||
| − | 5. Palaukiame kol virtuali mašina susidiegs. „Recent Tasks“ galite stebėti įvykių statusą. |
||
| − | |||
| − | [[Vaizdas:Cloud75.png|602x602px]] |
||
| + | 5. Back to Virtual Machines and select under Actions menu '''Power On and Force Recutomization'''. |
||
| − | 6. Prisidėkite tinklą prie virtualios mašinos. Paspaudę ant virtualios mašinos pavadinimo, išskleiskite “Hardware”, Pasirenkame “Connected”, pridedame “Network”, nurodome “Static – IP Pool”. Lango apačioje spaudžiame Save. |
||
| + | [[Vaizdas:Createvm5.png|none|miniatiūra|545x545px]] |
||
| − | [[Vaizdas:Cloud76.png|602x602px]] |
||
| − | |||
| − | '''IP pool''' – priskirs IP vCloud sistemą pagal joje esančius laisvus IP, priklausomai nuo to, kokį tinklą pasirinkote. |
||
| − | |||
| − | '''Manual IP''' – galite įvesti IP adresą iš to potinklio, kurį pasirinkote. |
||
| − | |||
| − | '''DHCP''' – VM sukonfigūruojamas IP pagal tinkle esantį DHCP serverį. |
||
| − | |||
| − | 7. Operacinės sistemos slaptažodį galite pažiūrėti paspaudę ant virtualios mašinos pavadinimo, išskleiskite “Guest OS Customization”. Laukelyje “Specify password” rodomas sugeneruotas slaptažodis. Rekomenduojame iš Operacinės sistemos pasikeisti slaptažodį. |
||
| − | |||
| − | [[Vaizdas:Cloud78.png|602x602px]] |
||
| − | |||
| − | [[Vaizdas:Cloud79.png|602x602px]] |
||
| − | |||
| − | 8. Rekomendacija: Sukurtai virtualiai mašinai '''išjunkite''' “Enable guest customization” ir “Change SID”. Lango apačioje spauskite Save. |
||
| − | |||
| − | [[Vaizdas:Cloud80.png|383x383px]] |
||
| − | |||
| + | 6. New created VM username is '''administrator''', generated '''password''' you can copy from DETAILS>Guest OS Customization tab. |
||
| + | [[Vaizdas:Createvm6.png|none|miniatiūra|548x548px]] |
||
| + | <br /> |
||
| + | [[Vaizdas:Createvm61.png|none|miniatiūra|712x712px]] |
||
| + | 7. Virtual Machine IP address you can view in VM DETAILS > Hardware tab |
||
| + | [[Vaizdas:Createvm7.png|none|miniatiūra|777x777px]] |
||
| + | Or by click Virtual Machines, change view |
||
| + | [[Vaizdas:Createvm8.png|none|miniatiūra|790x790px]] |
||
| + | <br /> |
||
[[Category:VCloud/en]] |
[[Category:VCloud/en]] |
||
Dabartinė 15:54, 13 kovo 2020 versija
1. If you want to deploy a new virtual machine by using a pre-installed template, click on the New VM button. Enter a name and hostname for the virtual machine, uncheck the box Power on. Select the template you want to use for this deployment and click OK to continue.
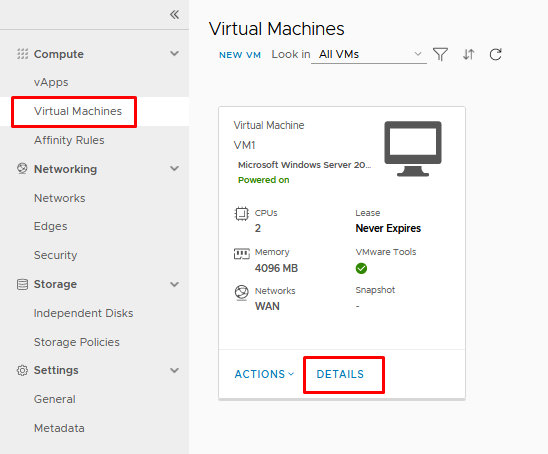
2. Once the VM's have been deployed, you want to review the virtual machine configuration. Do this by selecting the Virtual Machines section and click on the Details button of the newly created VM.
3. On the Details page, navigate to the Hardware section. Adjust the amount of resources assigned to the virtual machine according to your needs, and ensure that a network and IP mode are selected and the NIC is connected. Then click Save to continue.
4. On the Details page, navigate to the Guest OS Customization section. Enable guest customization, change SID and Auto generate password. Then click Save to continue.
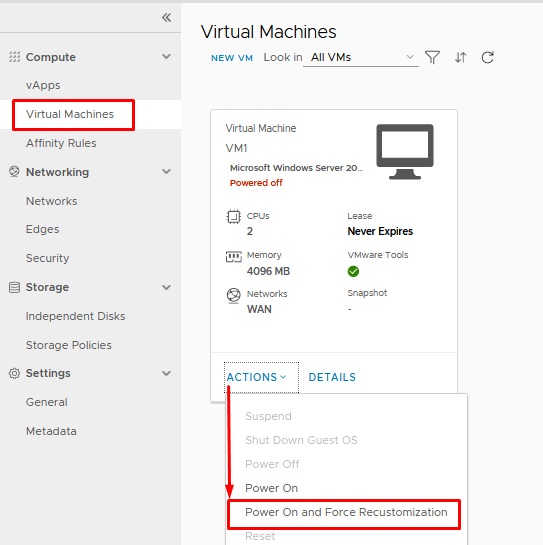
5. Back to Virtual Machines and select under Actions menu Power On and Force Recutomization.
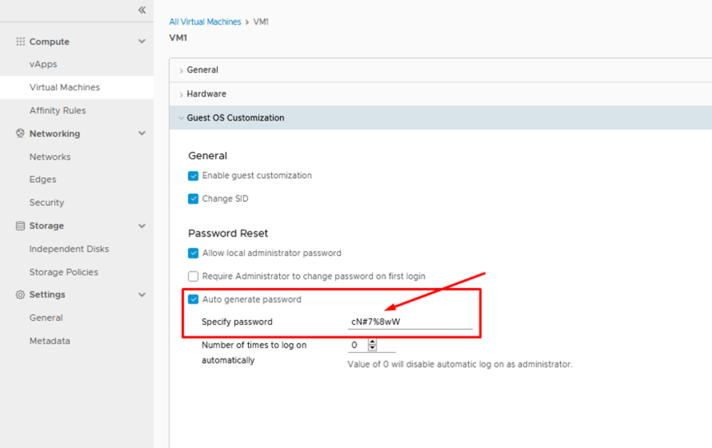
6. New created VM username is administrator, generated password you can copy from DETAILS>Guest OS Customization tab.
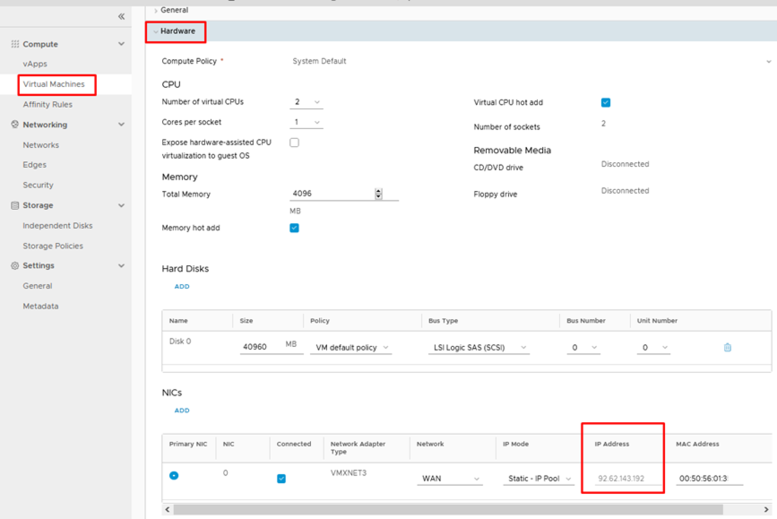
7. Virtual Machine IP address you can view in VM DETAILS > Hardware tab
Or by click Virtual Machines, change view

