Import OVA or OVF HTML5: Skirtumas tarp puslapio versijų
Iš Baltnetos komunikacijos.
| 1 eilutė: | 1 eilutė: | ||
| − | 1. |
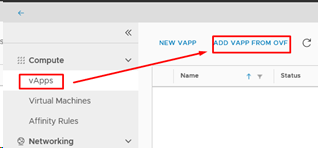
+ | 1. Go to vApps menu. Select „ADD VAPP FROM OVF“ |
[[Vaizdas:Cloud50.png|318x318px]] |
[[Vaizdas:Cloud50.png|318x318px]] |
||
| − | 2. |
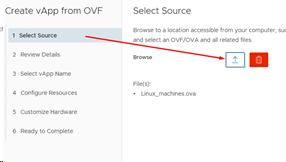
+ | 2. Select OVF or OVA |
[[Vaizdas:Cloud51.png|286x286px]] |
[[Vaizdas:Cloud51.png|286x286px]] |
||
| − | 3. „Review Details“ |
+ | 3. „Review Details“ - details about importing VM machine |
| − | 4. „Select vApp Name“ |
+ | 4. „Select vApp Name“ - specify name |
| − | 5. „Configure Resources“ |
+ | 5. „Configure Resources“ - specify computer name and choose disk type |
| − | 6. „Customize Hardware“ |
+ | 6. „Customize Hardware“ - you can customize hardware |
| − | 7. „Ready to Complete“ |
+ | 7. „Ready to Complete“ - review information and press "Finish" |
| − | 8. |
+ | 8. in the bottom of webpage in the „Recent Tasks“ tab you can see task progress. |
| − | [[Vaizdas:Cloud52.png|602x602px]] |
+ | [[Vaizdas:Cloud52.png|602x602px]] |
| − | |||
| − | |||
[[Category:VCloud/en]] |
[[Category:VCloud/en]] |
||
Dabartinė 16:21, 17 rugsėjo 2019 versija
1. Go to vApps menu. Select „ADD VAPP FROM OVF“
2. Select OVF or OVA
3. „Review Details“ - details about importing VM machine
4. „Select vApp Name“ - specify name
5. „Configure Resources“ - specify computer name and choose disk type
6. „Customize Hardware“ - you can customize hardware
7. „Ready to Complete“ - review information and press "Finish"
8. in the bottom of webpage in the „Recent Tasks“ tab you can see task progress.


